


|
|
|
| Control Line and Free Flight Discuss Control Line and Free Flight modeling here |
 |
|
|
Thread Tools | Display Modes |
 01-26-2008, 02:07 PM
|
#1 |
|
RCC Junior Contributor
|
Cap 21- First Ever Airplane
Hello
Last week, I posted for the first time as a newbie. In that note, I said that I was going to try and make my very first effort ever at constructing a model airplane. Today, I'm going to start it with my good friend Guy watching over me. This morning we went through some instruction on the tools used and safety, so I don't cut my fingers off. Guy gave me a plan for a control line Cap 21 to start with; he's giving me the balsa, glue, engine; everything to complete this plane, plus his time and knowledge. The plans are shown below: 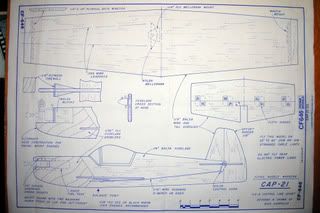 We thought it might be nice if I put my efforts on RCC as a small "building thread". Perhaps other newbies may be interested. Unfortunately, it may take awhile even for a simple plane, as my time and Guy's is limited by other life matters. I see by the frequency of posts on C/L that its probably not the most popular game. But, this will be fun for me, and I'm very excited about the project. Hope somebody else enjoys this too! |

|
 . .
|
| Sponsored Links - Subscribe to remove this ad. |
|
|
|
01-26-2008, 07:24 PM
|
#2 |
|
RCC Junior Contributor
|
Hi.
Not a whole lot of progress. I needed a balsa wing blank 1/8"x7"x29" and a profile fuselage blank 1/4"x4 1/2"x20". We edge glued 3" balsa sheet stock to make the blanks for fuselage, wings, and stabilizer. I learned to edge glue. Place the balsa sheets flat on the table, hold them together edge to edge tightly with masking tape applied the entire length, and then flip the blanks over. Lift the blanks up so the tape underneath bends and opens the joint. You can then apply carpenters glue to the joint. Flatten it out again, clean-up the excess glue, and then sandwich the blank between wax paper with weight on top. I knew I kept my old text books for a reason. They make great weights for edge glueing balsa. Leslie |
|
|
.
|
|
02-03-2008, 12:48 AM
|
#3 |
|
RCC Junior Contributor
|
Who Need's a Kit
Hello.
Well, I cut out all the parts for this very simple plane as per the plan, after the blanks were edge glued. It was my first time using a scroll saw, which I was able to purchase for a couple hundred.Well worth it. I glued balsa wingtips onto the wing and stab against the grain to prevent warping. Right now the wing looks perfectly flat, although I'm fearful about the level integrity after I apply the paint. This thin wing was such a bother to flatten out. Also, I applied DAP spackle to the wing so as to fill up the wood pores. This is something I learned off this very forum. Some photos of my progress. The edge glued blanks ready for cutting: 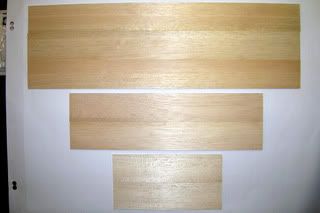 The pieces cut to the required shape: 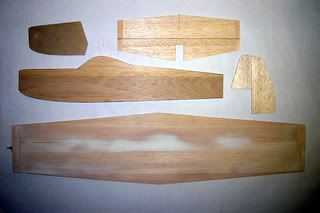 The engine Guy gave me; what a sweetheart! This NIB .049 hopefully will power my modest effort in the world of model building. 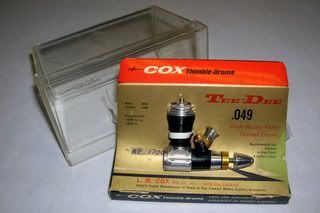 Now, here comes the first of probably many trivial questions. What kind/make of fuel do I use for this small engine? Does this engine require a "break-in"? Am I doing alright? My friend says I'm doing OK, but, he knows ziltch about small engines. Which brings to mind the next question, "Why does he have so many engines?!!" I had to edit this post, as one of the photos failed to appear originally. I'm using the system Guy taught me to post, though it seems fairly difficult. Especially posting photos! Anyway, my question still stands. What kind of fuel should I use for my small COX .049, and, does it require a "breakin" if its never run before? Any help would be appreciated. |
|
|
.
|
|
|
|
|
02-03-2008, 10:51 PM
|
#4 |
|
RCC Junior Contributor
|
Making a Mess
It is so easy to make a mess!
I tried to cut-in the elevator hinges with one of those dubro hinge slotters Guy lent me. Not so easily done, when the edge one has to work with is only 1/8" thick. I was able to make a mess of all four hinge slots, and really did a job on the first one, aside from poking myself more than once with that silly fork. My sloppy hinge installation: 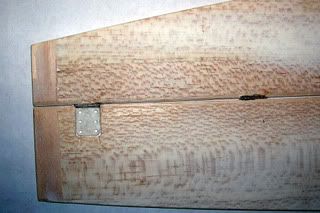 After I broke out the first slot, I sanded it square to accept some new wood. My hopes are that I can glue in a 1/16" piece of balsa on either side of it, and sandwich the hinge in. Then I can fill and sand it to shape again. On a happier note, I completed all the cuts today for the wing/tail slots and engine position. 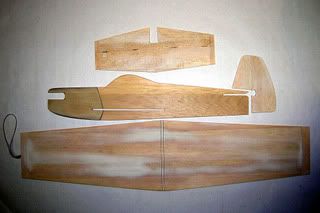 Hopefully, I can get that stab/elevator fixed so I can glue this thing together next week. Leslie |
|
|
.
|
|
02-03-2008, 11:39 PM
|
#5 |
|
RCC Supreme Contributor
|
Leslie,
Interesting build thread, keep it up! I don't think I've ever seen a build thread on control line before. On another note, I don't have answers to any of your questions, but I'm sure someone else will. Just a warm welcome to the hobby  Ben
__________________
Ben Hindmarsh "I keep planting planes, but they just won't grow!" |
|
|
.
|
|
02-04-2008, 04:41 AM
|
#6 |
|
RCC Contributor
I am: Brian C
Join Date: Jan 2003
Location: Bath,Ontario
Radio of choice:
Futaba Feedback: 19 / 100%
Posts: 326
Total Props: 2
|
Looking pretty nice Leslie.
Most any glow fuel manufactures fuel will work. Although i can not remember the proper nitro- oil content requirements. A quick search on google should give you the info. Gluieng in a peice of balsa over the exposed hinge and sanding to shape will work just fine. Brian |
|
|
.
|
|
02-04-2008, 05:57 PM
|
#7 |
|
RCC Junior Contributor
I am: Paul G.
Join Date: Dec 2004
Location: Leduc, Alberta
Radio of choice:
JR Feedback: 4 / 100%
Posts: 212
Total Props: 5
|
Nice project you have there!
If possible, try to obtain some Sig Champion 25% Nitro fuel, that will work really well. Great Hobbies & other shops carry it. The only warning when using a Cox TD is: Don't use less than 20% oil. Of that 20%, a minimum of 5% must be castor oil, which rules out any all synthetic r/c fuel. The minimum nitromethane content is 15%. Follow the Cox instructions & you'll be fine. If you google "049collectors association" you'll find all the Cox info you'll ever need & more. Wishing you the best of luck! Paul |
|
|
.
|
|
02-04-2008, 06:00 PM
|
#8 |
|
RCC Noob
|
Hi Leslie:
That engine is a TD 049 which is a competition engine with a lapped piston and high compression head. I have used them for years in free flight competition. You need a fuel with a fairly high nitro content and castor oil. I use Sig Champion 35 which is available here in Toronto from AJ's hobbies in Markham. I usually run them in for at least 20 minutes, starting with a fairly rich needle valve setting (needle out farther than it needs to be so the engine runs slow.) Over the 20 minutes you can gradually turn the needle in to speed the motor up. Hope that helps and good luck with your project. Simon |
|
|
.
|
|
02-06-2008, 10:55 PM
|
#9 |
|
RCC Senior Contributor
I am: Bill H
Join Date: Jun 2004
Location: Owen Sound ON
Radio of choice:
DX9 iX12 DX18 # of RCs: 50+
Feedback: 5 / 100%
Posts: 678
Total Props: 1
|
Break in.
That's good advice. This site:
http://www.mh-aerotools.de/airfoils/cox_frameset.htm will give you much needed valuable info. Things as simple as ingesting dirt in your engine must be dealt with carefully. If that happens it must be cleaned. Under no circumstances turn the engine over if it has gotten dirty. It should be stored with a clean rag wrapped around it. These engines are tough and will last a long time. Inversely, they are easy to damage if due care is not taken. There is a lot to know but that is what makes it so worth while aside from the fun of developing new skills and knowledge. I like to find an area where grass abuts a clean paved area. Start the engine and take off on the pavement. Walk backwards until you are flying over the grass. Get an experienced flyer to help if you can. An impact on pavement will end it all. On grass, very forgiving. You may want to remove the head on the engine and buy a Galbreath Head that takes Nelson Glow Plugs. The glow head on your Tee Dee can not be replaced easily as it or none of the parts are available commercially. Immerse yourself in the study of how to use the engine and parts sources will become known. http://www.kittingittogether.com/ If all goes well you may be able to maitain that engine for years to come. Keep the package and every other bit. I compiled a thread from RC Universe on the Cox .049's into a 36 page word document. The thread was cleaned up by the moderator and then locked. If you PM your email address I will send it to you. 36 pages of good reading. It is a discussion by several members and really good. Anyone else who would like it , just ask the same way. I started flying control line over 40 years ago. Still going. It is a discipline of it's own. Like Free Flight or RC. It's neither more or less of a category than the others. In many ways I wish I had just stayed with it alone. It's scope would use allyour spare time. The Classic and Stunt models are beautiful and the speed models exceed 200 kph. Even if you only have a fast .36 combat wing going it is a rush holding onto and controlling a model that is flying 120 mph. Good Luck and really glad to see another Control Line flyer. Cheers, Bill |
|
|
.
|
|
02-11-2008, 08:50 PM
|
#10 |
|
RCC Junior Contributor
|
Hello Everyone!
First of all, I'd like to apologize for not posting or answering in a timely fashion. Talk about overtime at the mine; I can only get on the PC periodically. Secondly, I'd like to thank all replys for the kind and helpful notes. I've read everything twice, and have learned; thankyou. And ModelBuilder, I've saved the excellent site you've presented, and have studied it. Anyway, I've repaired my shabby first attempt at hinge installation, the fix is pictured below. I also applied spakle to the entire airframe, against Guy's best wishes. He's cautioned me on the weight. However, I'm more concerned with the finish. I believe the engine he gave me will fly a stone. I also started glueing it together, using 30 min. epoxy. Waiting for glue to dry is such a bore. But, it gives me a chance to write this post. Below is my hinge fix. I cut 1/16" balsa and glued it to either side of the hinge using 5 min. epoxy. I then filled the voids with spakle and sanded it down. 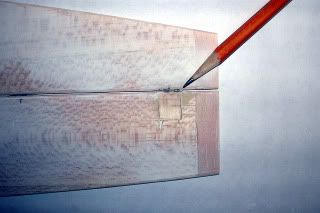 This is my glueing the whole show together attempt. I'm using 30 min. epoxy, applied sparingly along a line that will spread as I slide the wing into position. You can see the weights I'm using to try and keep everything straight and level. 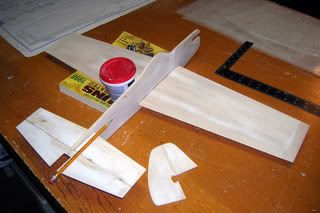 Another angle; the pencil is enough weight to keep the stab level; I hope. 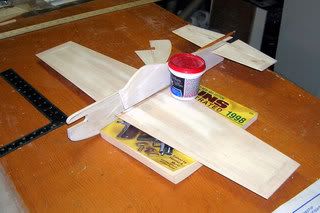 Anyway, time to go see if the glue dried OK! By the way, I'm travelling to the city tomorrow, to see if I can pick up some Sig Champion fuel. Leslie |
|
|
.
|
|
| Currently Active Users Viewing This Thread: 1 (0 members and 1 guests) | |
| Thread Tools | |
| Display Modes | |
|


 Linear Mode


 Your Privacy Choices